|
|
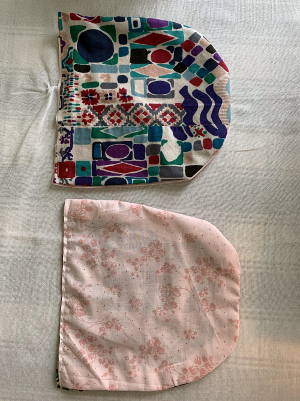
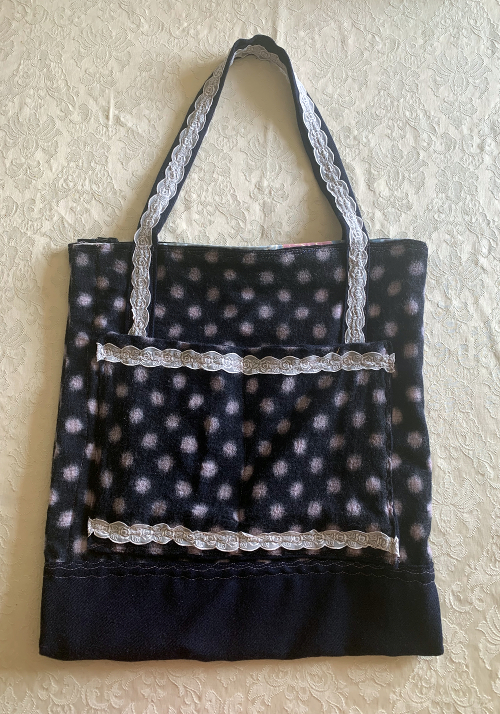 navy spot bag by A Howse |
|
We hope you are all enjoying a sunny Friday now Spring is finally here. We also hope you are keeping positive and finding creative ways to spend more time at home now. We are all staying in to help the amazing National Health Service team up with our other security and emergency services and save lives, during this important time trying to slow the spread of Coronavirus. Read about some more ideas on how to stay at home successfully here:
https://www.hotenough.com/2020/03/25/coronavirus-12-tips-for-staying-home-successfully/
|
|
During this time at Create Display we would like to bring you useful and artistic articles and tutorials to provide some engaging solutions for activities to brighten up your days whether you are at home helping the NHS, or if you are at home in social isolation. Do contact us to let us know what you have cleverly crafted!
Our online shop is open and we plan to add some more original pieces to the collection soon.
https://www.etsy.com/uk/shop/CreateDisplay
|
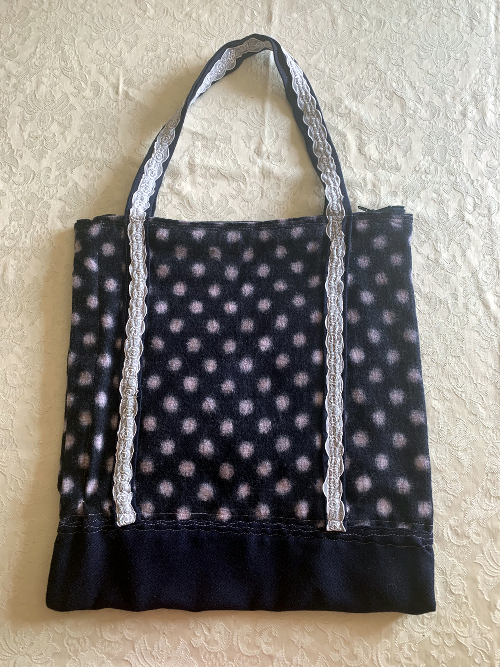 back of navy spot bag |
|
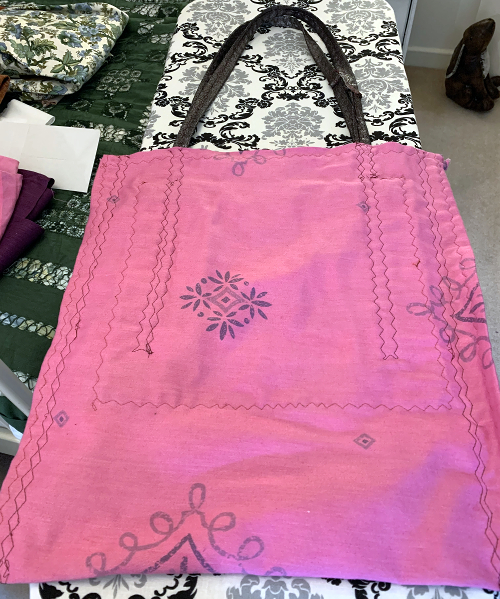
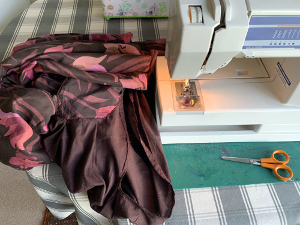
This project can be made easily by one person in one session sewing. Why not involve other younger members of the family and show them some basic sewing techniques? This week I have made a new bag to hold all my essentials and shopping as we adapt to our new routine of only going out to exercise and buy groceries when we really need to. We are very lucky to live by the coast and have a garden and shops we can walk to nearby. So this bag has enough room to store key food items like break and milk. This simple tote has two front pockets for a small Thermos flask and my purse.
|
|
Taking your own favourite hot drink is now a 'must have' as unfortunately all the cafes are closed for the next few weeks at least. As we always have plenty of rain showers most months in the UK this bag has a wide zip top and is made of two layers of good quality wool. This means the bag is strong and durable and it can be washed on a wool wash which is hygienic and will keep it look an smelling fresh. A cool iron can be used too to hold the shape nicely.
|
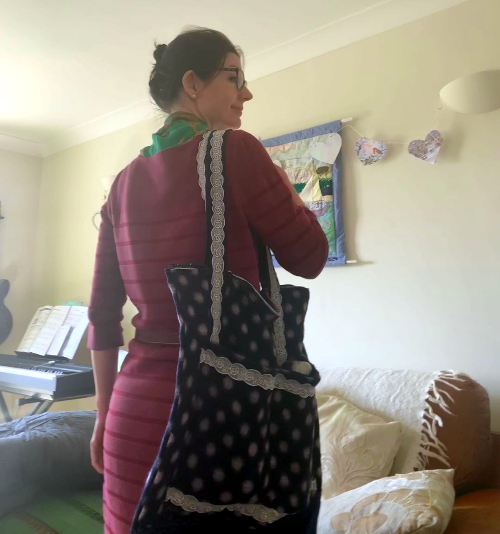
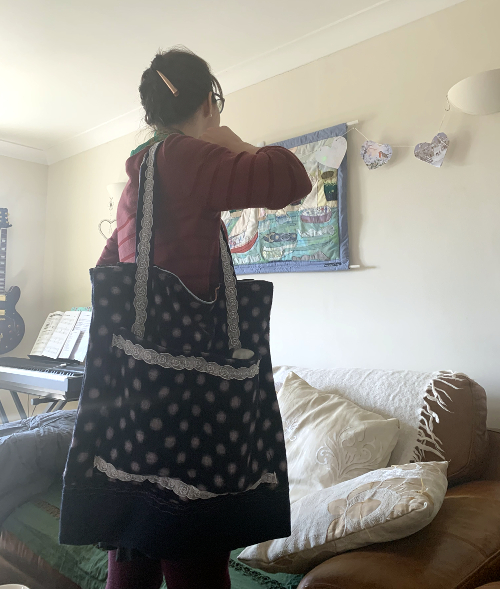 AH navy spot bag with flasks |
|
This bag was made the same way that the previous tote bags were made in my last blog tutorial you can see here, I just made it 50% bigger:
http://www.createdisplay.com/?p=2365
|
|
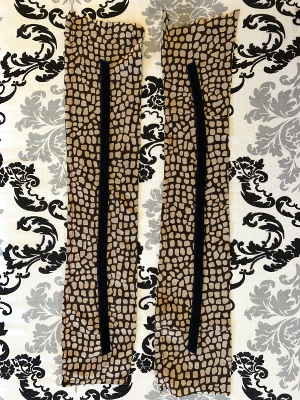
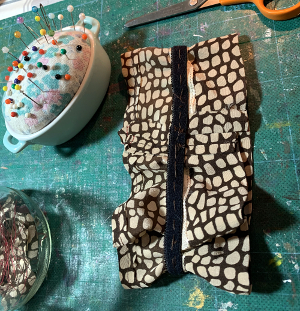
To start I selected the fabric. I upcycled a navy wool scarf with pale pink spots that I had worn a lot and wanted to reinvent into something new and lovely. I found some heavy vintage navy wool in my fabric stash and used it for the bottom of the bag and the lining. The dark navy wool works well for the bottom section of the bag as it will not mark easily if the bag is put down on the ground at any point. I have also made the generously wide straps out of this strong plain blue material so they can hold lots of weight in case I buy anything heavy.
|
|
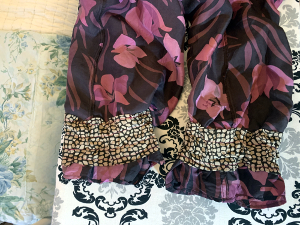
To keep the design looking cheerful and give it a white blossom inspired flourish, I have edged the front pockets and the straps by hand with a rows of shaped roses in slightly opaque polyester ribbon. The white stripes also help me be seen by other traffic if the daylight is dim down our country lanes.
|
 AH navy spot bag detail |
|
This spotty accessory is unique and if you do go to the supermarket you won't get mixed up with anyone else's trolley. I hope this post may motivate you to create your own unique item out of second hand supplies online (most shops are closed for a while) or fabrics, clothes and soft furnishings you already own.
|
|
I can recommend my local independent fabric shop The Eternal Maker where you can shop online and receive supplies in the post
.https://eternalmaker.com/
|
|
I purchased my matching zip from Hobbycraft
https://www.hobbycraft.co.uk/
|
|
Stay in, keep creative and be well, we're all in this together!
|
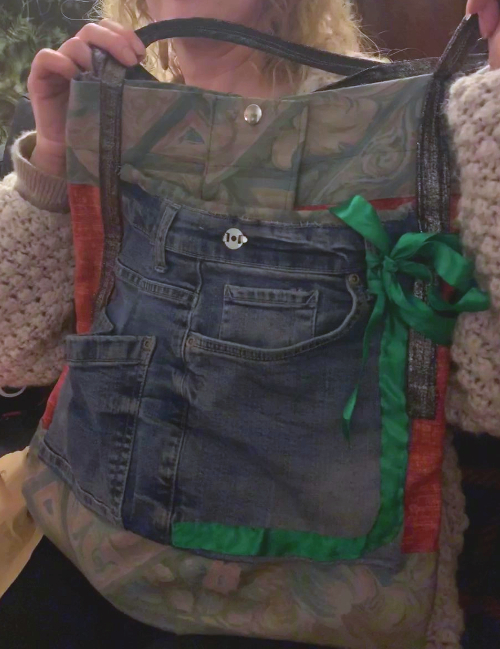
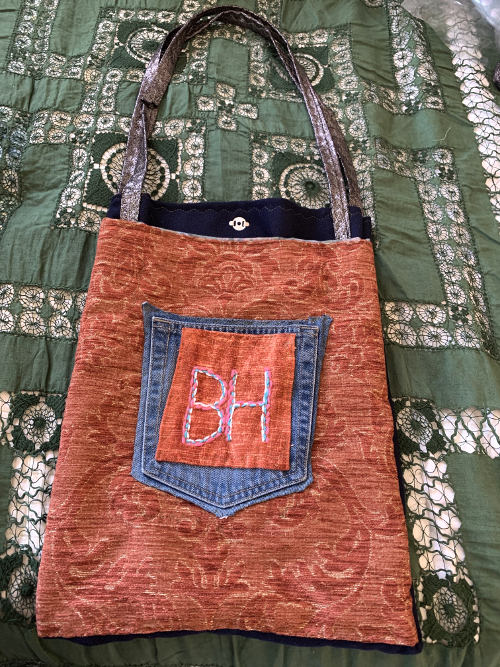 Personalised tote bag |
|
It is simple to sew some personalised tote bags for your friends and family. These eco-friendly presents are sure to please them at any time of the year. Ideal for keeping in the car and in the hallway for trips to the market or grocery shops, these shoulder bags are cute enough to take to town and hit the fashion and antique stores too. This man bag has hand embroidered initials so nobody else will ever pick it up by mistake and the textured emblem adds an individual touch to the design.
|
 Tote bag base sew |
|
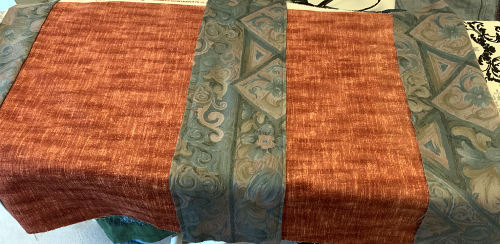
Step 1: Decide how big you would like your finished bag to be. Measure your base fabric with two times the height of your bag plus allowing 40mm extra fabric for hems all the way around the bag width and height. You can sew different fabrics together like a patchwork to make the base size you want and this can make the bag more striking. Add a bag lining by cutting a piece of fabric the same size and placing it beneath your main fabric.
Step 2: Cut a panel at least 100mm deep and the width of your bag plus 40mm for hem allowance. Press and sew the edges neatly and use the sewing machine to attach the panel onto your bag across the middle, to form an extra bag base layer.
|
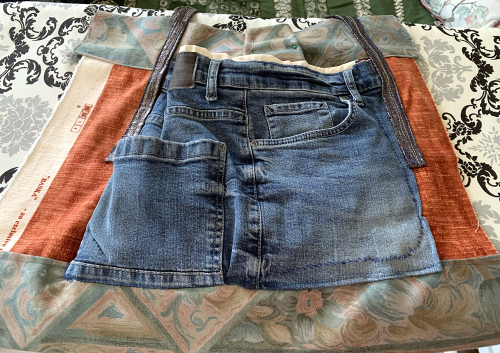 making denim pocket tote bag |
|
Step 3: Select a contrasting fabric to make a front pocket which is 50mm less wide and high than your basic bag. This bag will have multiple pockets as it utilises a section from a pair of jeans which already has extra pockets. Fold and press the 20mm hem edges of the pocket inwards and sew around the pocket and onto the front of the main bag piece. Making sure to leave the top section open so you can access the pocket and check that it lines up with the front face of the bag correctly.
|
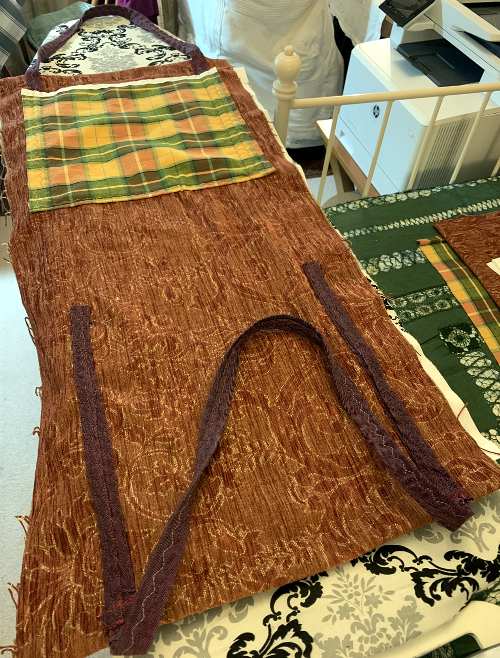 Adding straps to tote bag |
|
Step 4: Take a substantial weight fabric in a polyester or similar strong weave and cut two strips of fabric 50mm wide and double the height of your bag plus an extra 500mm to allow for the bag strap length. Using an iron press the hem edges of the strips inwards and then fold to give the desired strap width. Ensure the finished strap is at least 20mm wide to allow for easy stitching and make it comfortable on the shoulder to use.
Sew the straps on each long edge to form the neat long shapes. Using pins attach to the front of your bag on each side of the front pocket and check the strap length is appropriate for the height of the bag user. Turn the ends under neatly out of sight and sew onto place. Line up the remaining strap on the back of the bag to match the front strap position and sew in place.
|
 Sewing tote bag sides together |
|
Step 5: Fold the length of the bag in half 'inside out' so the bag lining is on show. Sew two lines of stitching close together along the side edges of the bag being careful not to catch the straps in your stitching lines. Turn the bag the right way around to see your finished bag.
|
 Bag with clasps and ribbon |
|
Step 6: One optional extra feature is to add large clasps to your bag. Cut tiny slits in the fabric at the top middle of your back at least 50mm from the top edge. Insert the outer metal clasp prongs into the slits and use a small pair of pliers to bed the metal flat to secure the clasp. Repeat with the inner metal clasp on the other side of the bag and your bag will be able to be securely closed.
|
 Vintage fabric tote bag |
|
Making tote bags is a great way to upcycle up pretty vintage fabrics that would have previously been used for soft furnishings. Making patterned bags can also be a brilliant way to add interest to a plain outfit and even very bold and very young feminine patterns can be worn by all people of ages.
|
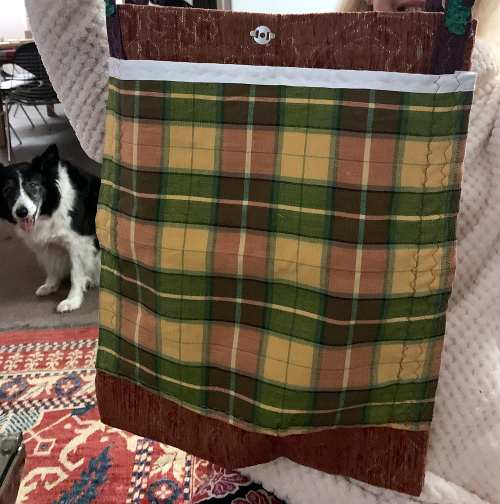 Strong checked fabric bag |
|
Selecting heavier fabrics will ensure you can carry heavy objects in your bag. Think about what the maximum thickness of fabric can be that your machine can sew happily once you have a lining and 'double folded layers' when you are sewing the sides together.
|
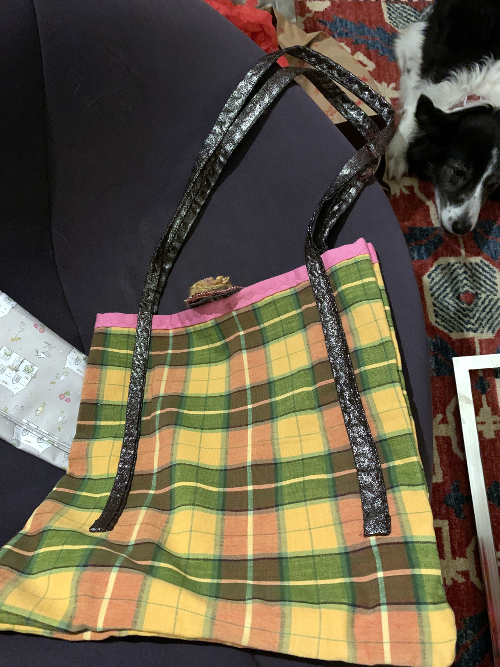 Plaid bag with floral brooch |
|
Another way to embellish your original product designs is to add handmade brooches and badges. Brooch backs and clasps are available at almost every haberdashery craft shop in the UK. This vintage fabric floral brooch pins this unique tote bag together stylishly.
|
|
Do send us photos of your handmade tote bags and enjoy giving these pretty little gifts, that don't take very long to create. Ditching plastic in favour of natural materials is good for the environment and these tote bags can be used for storing small items tidily around the home too . Have a creative day!
|
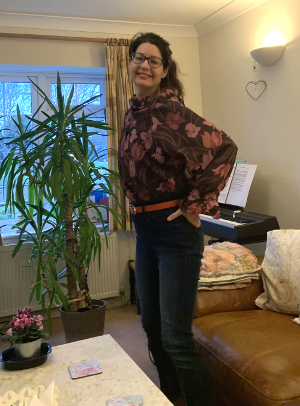 Silk top from left side |
January is a great time of year to go through your wardrobe and have a good sort out.
Repairing, updating and altering your garments is better for the environment.
Although it is tempting to hit the sales and stock up on more fast fashion, this uses the planets precious resources of water and energy during the retail production process.
Sometimes it can happen that we like an item of clothing in our wardrobe but we just don't wear it enough to justify the hanging space.
|
 basic tunic shape |
This can sometimes be because although the quality, colour and fabric of the dress (for example) is good, the garment does not suit our favourite silhouette.
By this we mean the shape or outfit choice that we most select to wear, for example an 'A' line dress and short cardigan or skinny trousers and a loose top.
|
 silk triangles for shwl collar |
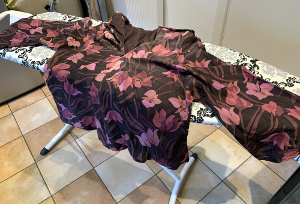
In this post we are transforming a full lined, midi length skirt with a zip waist into a loosely fitted tunic top with full sleeves and a wide 'roll neck' collar with a zip at the back.
Start by making sure your skirt is ironed and laid flat and smoothed out on your table and the fastening is at the centre of the fabric.
|
 Skirt waist becomes new top collar |
Make sure the back and front of your fabric is lying on top of eachother perfectly so that the bottom seams are matching correctly.
Select a top that fits you well already. Using it as a pattern, lay out the garment and pin around your favourite shirt to create the right shape for your new tunic. Leave plenty of length for full sleeves.
|
 sewing new arm holes |
Cut around your pins making sure you leave 20 mm for hemming all the way around. Just leave the bottom hem as it will form the bottom of your new top.
See this previous tutorial blogpost for more details on how to do this:
http://www.createdisplay.com/?p=2308
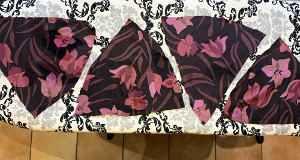
Take the pieces you have left over and cut in two to create four triangular pieces.
|
 flat cuff pieces |
Ironing a small hem around each piece lay the pieces around the inside the new collar of the tunic (what was the waist of the skirt) and sew in place either by hand or by machine whichever you think will look more attractive on the front of your new blouse.
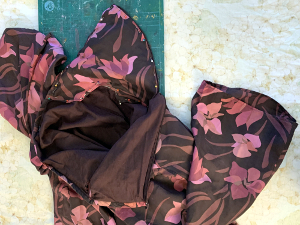
If your original skirt has a lining, cut off the newly created arm sections so that just two large arm holes remain so the tunic will hang from the shoulders nicely without too much bulky fabric. Neatly press and hem the arm holes by machining all the way around.
|
 ruched cuff ready to sew |
Cut two strips of flat elastic approximately twice the width of your hand at its widest point so that you will be able to easily push your arm through the cuffs.
Lay the elastic pieces on top of two pieces of silk or similar weight fabric leaving 20 mm around the sides and top of the elastic strips. Sew the elastic onto the middle of the silk pieces and attach together at the ends so they make a loose circular shape.
|
 both cuffs on silk shirt |
Hand sew the elastic cuffs into place on each arm creating a flattering shape for your body type and leaving a comfortable hem on the bottom of each sleeve.
We made four 'rings' of sewing to attach the elasticated cuffs in toital so that the silk fabric layers lie comfortably flat and hang well once ironed.
|
 Silk top looking at wall hanging |
Enjoy wearing your new tunic top and don't forget to add a belt if you want to dress up your look, show off your waist and add definition to your outfit.
Alternatively wear with skinny leggings or trousers or tuck into high waisted jeans.
For a more relaxed look for relaxing at home for example pair with wide leg trousers or a short skirt and tights if it is cool.
|
|
|
|
 Silk top close up front |
The pattern on this shirt is quite bold so it is a good idea to coordinate with plain pieces to keep the outfit elegant.
Let us know if you are inspired to upcycle any of your apparel this Spring.
We love to see your handmade projects so do contact us at our Create Display page on facebook or email a message and photo to:
admin@createdisplay.com
Have a creative day!
|
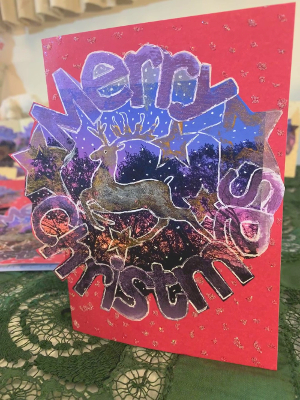
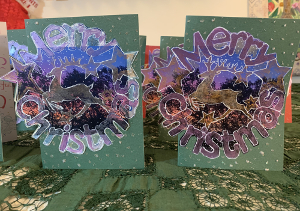 Handmade Xmas Card |
Happy New Year! Wishing you a delightful 2020!
We hope you all had a great Christmas and so far the new decade has been wonderful.
I'm sure you have all had a busy festive season and its been a few weeks since I last posted onto the Create Display website.
This post will serve as an initial mini winter catch up with more crafty project updates in the pipeline!
|
 Sussex sunrise |
Talking of the holidays, this year we made some handmade Christmas cards for those people we were meeting up with over the festive season.
The image on the cards was inspired by the sunrise view in winter in Chichester harbour in Sussex. The reindeer reminds us of the deer that can often be seen relaxing in or running across the fields.
|
 red handmade Xmas card |
To begin the little project we put carols on the studio radio and then selected a carved wooden decorative block that was already in our Christmas craft box. I liked the round shape of the block, that was initially sourced locally.
Metallic acrylic paints from Hobbycraft were painted over the block and pressed onto the printed image that was created using an HP Laser Jet Pro (MFP M477fnw) and standard white A4 paper.
A white fine liner pen from Paperchase was then used to detail the text and outline the reindeer.
|
 Multicoloured Xmas cards |
The cards were then cut around the letters, with a sharp craft knife from Hobbycraft, to form an unusual shape that 'popped' out when the card was opened.
Old glitter from our Christmas craft supplies was then sprinkled onto pva glue dots that were applied with the end of a thin paintbrush to finish the jolly paper tokens with a bit of magical sparkle.
I like to collect and use rubber stamps for the inside of my cards with appropriate messages for the season and treat myself to a metallic pen for embellishment. The January sales is a good time to buy these materials ready for the end of next year.
|
|
More winter craft projects to follow on my next post soon…
|
Have a super creative day!
|
|
https://www.hobbycraft.co.uk/
|
Extra craft supplies from Hobbycraft
|
|
https://www.paperchase.com/en_gb/
|
Fine white and metallic writing pens from Paperchase
|
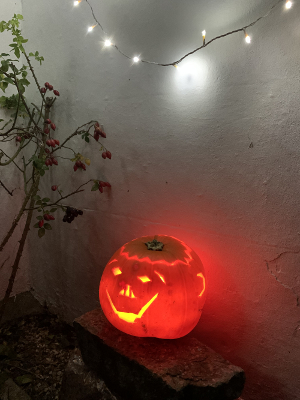
 Hand carved pumpkin |
Happy Halloween from Create Display!
We hope you enjoy a fun filled weekend celebrating everything spooky, scary and Autumnal related.
As you can tell our favourite part (along with some great spooky music classics) is the pumpkin carving which has been part of Halloween tradition for generations.
|
 pumpkin in garden |
Here we have created a simple welcoming display at the cottage by stringing up soft white fairy lights in a festive path to the front door.
A clear plastic shoe box has been quickly covered with recycled clear gold star wrapping paper. This provides a base to support a rectangular stone and this jolly glowing alternative lantern.
A basic cm diameter white candle is stuck into the middle of the orange vegetable and lit with a match. The 'lid' is then popped on to add to the striking effect.
|
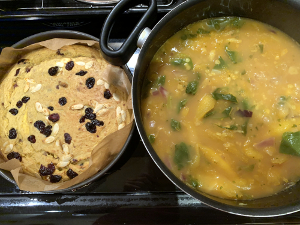 pumpkin cake and pumpkin soup |
The wonderful thing about pumpkins is there is a whole big mixing bowl of pumpkin flesh with which to make delicious dishes. Here we have chosen to bake a pumpkin and cranberry cake with ginger and cinnamon. Warm up ready for going out into the cold with a healthy soup with red onions, lentils and spinach and plenty of spices.
|
|
Don't forget to bake those pumpkin seeds for 10 minutes, yum!
|
|
 Finished Dress with Interior Textiles |
Buying second hand and vintage clothing like this colourful Pierre Cardin skirt is better for the environment.
It is worth re-cutting, customising and upcycling pieces you already own as it is a fun way of personalising your wardrobe and it ensures you use everything you have, for as long as possible.
As this dress is meant to be floaty and roomy to allow for wearing on hot days I am keeping the construction super simple. To start I laid the ironed skirt spread out flat, making sure the button and zip of the skirt is exactly at the middle of the back of the skirt, against the table.
|
 Skirt to Dress Upcycle 1 |
Step 1:
Firstly take a garment from your existing wardrobe that fits and hangs well and use the shape as a guide for creating the arms and the body of the garment. This stripey Laura Ashley cotton jumper is perfect as a guide. Plus it will lie flat easily and not move around like other more silky shirts might.
I pin around the outline of the jumper and allowing 20mm for a seam allowance around the sweater and cut the new shape out of the skirt. I ignore the bottom hem of the jumper though, as I want my dress to be as long as the drop of the skirt was, finishing just a couple of centimetres above my knees.
|
 Cutting Dress Pockets |
Step 2:
Secondly, turn the two main pieces inside out. They are joined at what was the waistband of the skirt and is now the neckline of the dress, already complete with a zip and a button at the back of the neck.
Step 3:
Thirdly sew along the sides and underneath what will now be the sleeve edges on both sides reveal the dress shape ready to go. Make sure to leave generous openings for the hands and armholes to make sure that popping this tunic on a breeze. Turn the garment right side out again and lay front face up on the table.
|
 Dress Pockets Ready to Stitch |
Step 4:
The fourth step uses the lovely cut out fabric from the extra skirt width, which is now not needed. These offcuts are perfect for constructing a pair of useful pockets. Just make a template out of a piece of unwanted A4 printer paper (from your recycle bin) by folding the paper in half lengthways and using paper scissors to cut a curved shape that will fit the size of your hands neatly.
Step 5:
The fifth step is to cut out your pocket pieces and as before, leave a 20mm hem around the template.
|
 Finished Dress in the Garden |
Then cut out two lining pieces in exactly the same way. Pin the 'wrong' pocket sides together and sew around the edges leaving a gap that is large enough to pull the fabric the right way around again.
Step 6:
Then press and sew the gap up and you will have two pretty shaped pockets. Position the pockets on the front of the dress so you can put your hands into them easily at the right height and pin. Then just sew the pockets onto the front of the dress leaving them open and accessible at the top and sewing neatly along the edges of the lined pockets to keep them in place.
|
|
Your dress is now ready to wear, just a belt in a coordinating colour if you like to highlight your waist. This dress is fairly short in length but it has long sleeves that look good simply rolled up, so it is perfect for hot summer days.
As the mornings and evenings become cooler, cosy up by adding layers.
|
Co-ordinating tights, leggings, a cardigan or jacket all work well.
Add boots and a pashmina style wrap. and you are all set for Autumn.
|
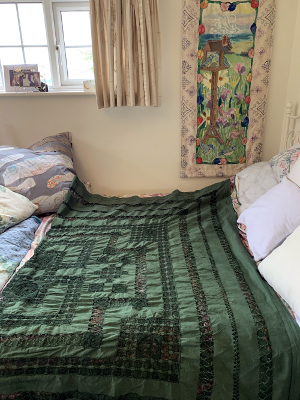
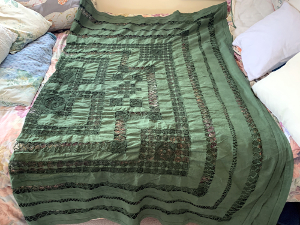 Vintage tablecloth in Forest |
This summer we have enjoyed a heatwave along the south coast of England.
The longer days and dry weather are useful for drying fabrics on the line outside.
We wanted to give a soft, cool and welcoming feel to our cottage this season so we have dyed some vintage textiles a luscious green.
|
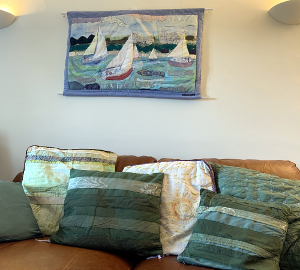 Handmade Wall Hanging & Cushions by A Howse |
This tablecloth is special because it has a beautiful lace detail and is excellent quality linen. However it was slightly marked in places as it is at least three generations old and has been stored in the loft for some years. So we gave it a new lease of life using Dylon machine wash dyes.
A rainbow of shades can be purchased for a few pounds from good haberdashery stores like Closs & Hamblin and Hobbycraft. Hardware stores with a big range like Robert Dyas in the UK are also a good place to look for Dylon displays.
|
 Garden wall hanging by A Howse |
I consider carefully before using machine dyes as the chemicals can be harmful to the environment if used in large quantities. I like to collect several pieces together of clothing and soft furnishings to get the most out of each load I put in my appliance. It is great to refresh and reinvent garments and home textiles and make them useful again.
This time I added to the project basket several cushion covers I made upcycling strips of pre-loved fabrics and sewing them together in stripes. The forest green colour by Dylon blends perfectly with the Van Gogh apples rug that can be seen here: http://www.createdisplay.com/?p=1961
|
 Deer in West Sussex field photo by A Howse |
The Osborne Bay wall hanging hanging above the chestnut leather sofas finishes off this cool textiles look.
The countryside view from the windows and the bold plants in this sitting room interior combine to add more soft lime and lush emerald hues. These botanical splashes are a great way to liven up the natural colour scheme of the walls, ceiling and furniture while keeping the overall look chilled and inviting.
|
|
|
|
|
References:
|
|
|
https://www.dylon.co.uk/en/home.cky.html
|
Dylon UK
|
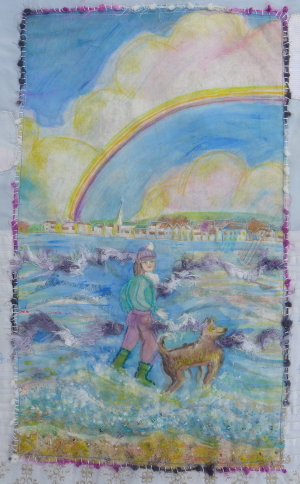 Girl with Dog and Rainbow Wall Hanging by Amanda Howse |
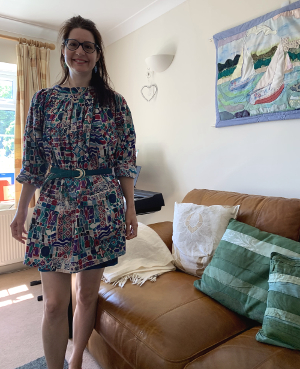
My latest hand made wall hanging is inspired by the Spring rainbows that brighten up the skies during the cool changeable weather we get in West Sussex well into May.
This original piece features a young woman walking her dog along the shore at Bosham which is one of the historic waterside villages within the winding natural coastline and port of Chichester.
The old church at Bosham (which is featured in the Bayeaux tapestry) can be seen in the background.
|
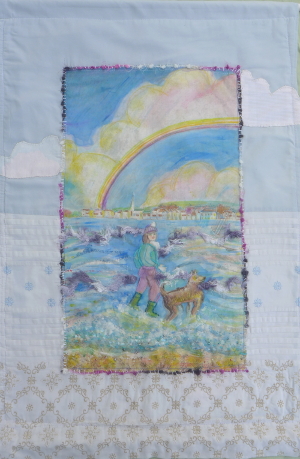 Girl with Dog and Rainbow Wall Hanging by Amanda Howse |
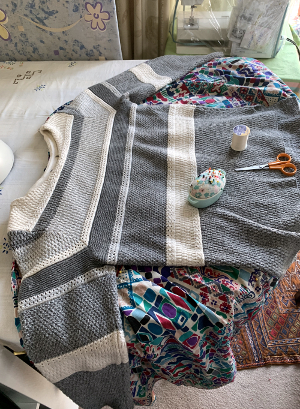
Vintage fabrics by Viyella and Blendworth are used to construct the piece along with wools and beads to create this one off upcycled textile artwork.
Fabric paints and embroidery threads describe the colourful scene where the girl splashes through the water in her Wellingtons with her canine companion striding ahead.
Waves crash onto the beach and the windy day atmosphere is created with textured stitching in the sparkling water and extra applique clouds.
|
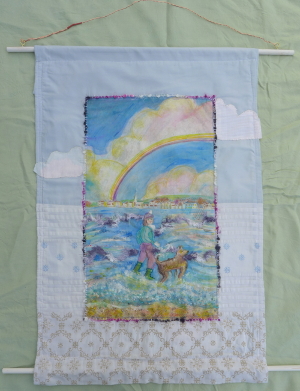 Girl with Dog and Rainbow Wall Hanging by Amanda Howse |
Painted poles give structure to the hanging which is finished with twisted copper wire ready for easy hanging.
This home accessory can be carefully rolled and transported easily and is ideal for those who travel or rent and like to move their pictures or change their interiors frequently.
For more details and to view and purchase other work in the collection head over to our online shop.
We are looking forward to more pieces in the pipeline to follow online over the next few weeks too…
|
|
https://www.etsy.com/uk/shop/CreateDisplay
|
Create Display Etsy Shop
|
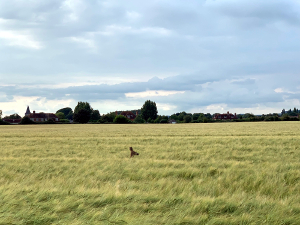
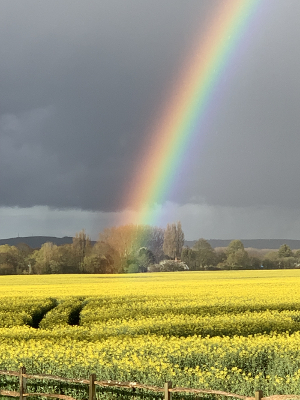 Rainbow over Field West Sussex photo by Amanda Howse |
This is one of the best rainbows we have enjoyed this Spring.
This 'pot of gold' is in a flowering rapeseed field looking towards the South Downs in West Sussex.
For more of the latest stories about what is happening on the South coast and beyond this season, check out our exciting new online news blog:
|
|
https://www.hotenough.com/
|
hotenough.com
News and whats hot
|
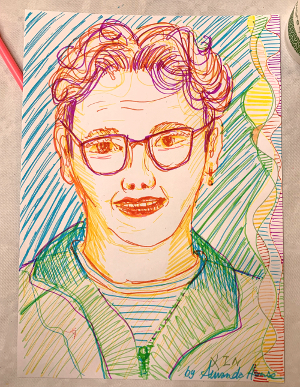 10 minute portrait of Xin by A Howse |
Walter deForest gave a superb performance as Van Gogh and brought the Dutch master's life and his work to life through telling his story.
Participants were encouraged to draw their audience neighbours and this is a portrait in pen of a gentleman we just met called Xin.
As these were the first portraits we have done for some time we were pleased when Xin wanted to take it home to enjoy with his family who were also enjoying the cultural occassion.
|
 Sunflower picture by A Howse |
Everyone drew sunflowers throughout the evening of course!
It was great to experience such a high qulity inclusive accessible arts production in an inner city area which is currently going through a lot of change and regeneration.
This community arts center is the home of Draper Together which is a charity that aims to forge a strong and positive community through its inclusive programme which focuses on youth arts and theatre.
|
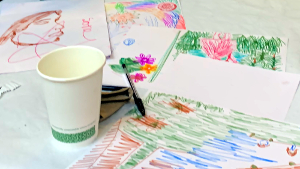 Li girls drawings at Drapers Hall |
People of all ages had an educational and fun time and everyone enjoyed the delicious home cooked supper and hot drinks that were provided so carefully by the enthusiastic team at Drapers Hall.
|
 Cherry Blossom at Drapers Hall
|
We look forward to going to more special shows at this Southwark centre soon and more brilliant crazy art days in the future!
We also plan to see the Van Gogh exhibition at tate Britain which is in London for a couple of months from the end of March and is sure to be a visual treat!
|
|
https://communitysouthwark.org/organisations-venues/venues/draper-hall
|
Draper Hall
|
|
http://www.waltermichaeldeforest.com/
|
Walter deForest
|
|
https:/www.drapertogether.org/
|
Draper Together
|
|
https://www.tate.org.uk/whats-on/tate-britain/exhibition/ey-exhibition-van-gogh-and-britain
|
Van Gogh at Tate Britain
|
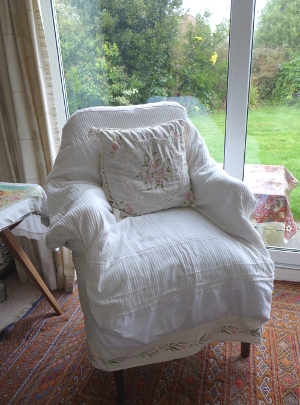 Armchair with Cream Cover and Flower Border Trim |
This month we were lucky enough to receive a beautiful mahogany Victorian carver dining chair from a close family member who was downsizing recently.
This special seat was part of a set that had been handed down through the generations. It has been enjoyed by all who sat in it during numerous splendid gatherings in a spacious dining room in the country county of Kent.
This carved wooden armchair is wonderful memento of many jolly times around the table and still a very useful furniture piece.
|
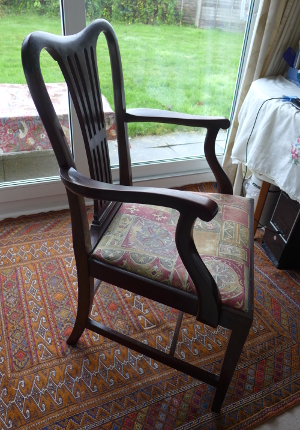 Vintage Chair Before |
Our 'garden room' in the cottage in West Sussex is normally used as a work room and provides an office and studio space with excellent natural light for writing, reading, computing, drawing, painting and sewing. This charming room needs one good comfortable cosy and attractive chair that can be used for all of these various activities.
The garden room also doubles as a guest bedroom for when friends from afar come to stay with us. A variety of fabrics are folded and draped on the cream metal bed as textile projects progress.
A soft and warm solution was required for this furniture newcomer to enable the seating to feel homely as well as being strong and practical.
|
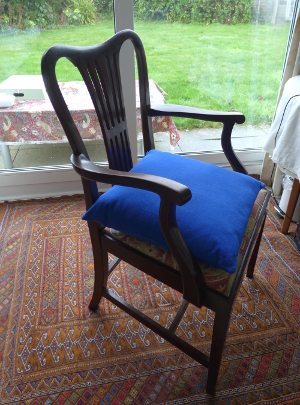 New John Lewis Cushion on Vintage Chair |
First we added a large plain blue coloured cushion from John Lewis. We found an unwanted second hand cotton and polyester mix striped set of cream curtains in perfect condition. We cut off the curtain tapes so we were left with just the flat fabric to work with.
We measured all the sides of the chair individually starting with the front face and made a simple diagram on a piece of paper to record these basic dimensions.
Next we took an extra duvet cover in new condition and cut out the basic flat shapes that make up the front, back and inner sides of this vintage furniture piece. We ensured that the pieces would combine when sewn together to cover the whole item with around 10 centimetres of the feet of the chair left visible at the base.
|
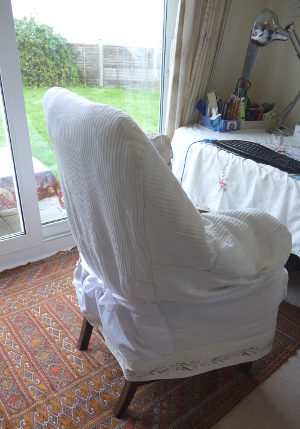 Vintage chair cover side view |
This allows the floor to be seen underneath the loose cover which helps to visually open up the room and help keep it from feeling cluttered.
When all the parts were cut out of duvet wadding we attached them to the matching stripey fabric shapes for each part of the chair. We made sure that the wadding was tacked in place to the 'wrong side' of the fabric so it wouldn't be seen once in use. We used one piece of fabric to create a central 'draped seat' section that covers the blue cushion and minimise the amount of detailed sewing required.
By 'offering up' the fabric and using the chair as a template, a loose cover can be created quickly without the need for more than basic dimensions.
|
 Loose chair cover with ribbon bow back tie |
Hand sewing pieces together making sure the raw edges are left on the inside when the cover is finished can sometimes be quicker when making small projects. A degree of 'crafting' as you go along is involved.
The sewing machine can be used if it is easier or alternatively just for binding the longer seam joins if this is more comfortable.
This technique is reminiscent of wrapping a large present which is a slightly less than conventional shape!
Then once we were happy with the cover shape we stitched on two half a meter lengths of 10 centimetre wide cream ribbon. This was attached to the lower back face of the chair which then allows for easy removal whilst also gathering the loose cover into a more fitted shape.
|
 Cream chair with flower border and cushion |
A cute bow is tied to enhance the simple design.
We then took off the cover put to one side while we cut generous cream cotton lining fabric pieces to fit inside our stripey fabric and padded faces structure. Using the sewing machine combined with hand sewing we turned our cover inside out and attached all the lining faces. We took care to make sure the raw edges were on the outside this time so when the cover was turned the right way round again, all the sewn edges are all tucked neatly out of sight.
|
|
Finally using small stitches and cream thread we added a vintage Laura Ashley tulip design stencil border in soft pink and green on cream cotton all the way around the bottom edge of our freshly made loose covering.
An embroidered cream cotton scatter cushion with light pink flowers and crochet lace edging adds extra back support and coordinates perfectly with the other ivory soft furnishings in this peaceful and sunny room.
|
To see more hand crafted and original textiles by Create Display visit us at Bosham Walk or check out our online etsy shop….look out for more new pieces in the pipeline this Spring!
|
|
|
|
|
https://www.johnlewis.com/
|
John Lewis
|
|
https://www.lauraashley.com/en-gb/home
|
Laura Ashley
|
|
https://www.etsy.com/uk/shop/CreateDisplay
|
Create Display Shop
|
|
|